With summer rapidly approaching, now’s the time to get your grill primed and ready for another season of backyard cookouts, burgers and barbecue. And the very first step is to clean the entire grill of all remnants from last summer’s cooking adventures. Even if you wiped down the grill before putting it away for the winter, it’s important to start each new grilling season with a thorough cleaning. And here’s why:

The same grilling practices that makes those Instagram-perfect, flavorful char marks on your burgers and steaks also produce carbon deposits on virtually every surface of your grill, including the grates, hood, interior of the firebox, and flavorizing bars and burner tubes (on gas grills). Those carbon deposits aren’t just ugly; grease and sugary sauces can stick to them and harbor bacteria. And excessive carbon buildup can cause the grill to heat unevenly, not reach full operating temperature, and gas-burner tubes to prematurely fail.
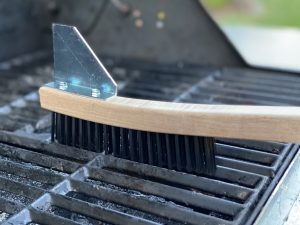
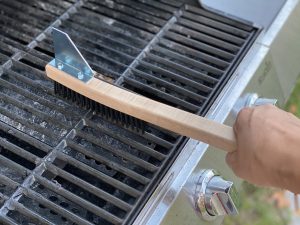
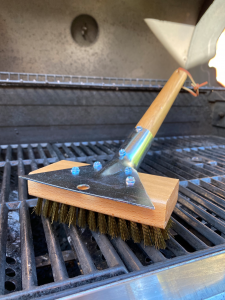
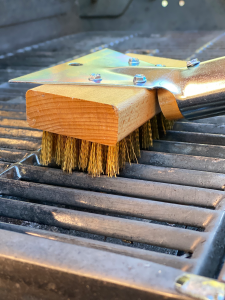
To make the grill easier to clean at the start of each new grilling season, follow these simple steps throughout the summer: Use a wire brush to scrub the grill grates clean after every cooking session, and be sure to remove any loose wire-brush bristles before firing up the grill. If you barbecue frequently, say at least once per week, thoroughly clean the grates every two months. And twice a grilling season, you should give your grill a thorough cleaning, which will help it cook better and last longer. By the way, the basic cleaning procedures presented here are essentially the same for gas or charcoal grills; charcoal grills just have fewer parts.
Grill Cleaning Equipment

Go online or to your local hardware store and you’ll find dozens grill-cleaning tools, gadgets and gizmos, but nothing can beat a long handled wire brush, wire bottle brush, five-gallon bucket, and some elbow grease. Avoid using toxic chemicals to clean your grill since they can impart an off taste to foods. Instead all you need is some warm water, grease-cutting dish soap (like Dawn), and a poultice made of white vinegar and baking soda.
If your grill has stainless steel exterior surfaces, a good stainless steel cleaner adds a little extra shine. You’ll also need a pair of long-cuffed rubber gloves and a few disposable scouring sponges and several cotton rags. When cleaning stainless steel, wait for an overcast day; the hot sun can make it hard to remove streaks from stainless steel surfaces. Plus, it’s more pleasant working in cooler weather.
Burn It

To clean a gas grill, start by firing up the grill, closing the hood, and letting it come to full temperature. Wait at least 30 minutes for the extreme temperature to singe any stuck-on food or grease. Next, dip the wire brush into a bucket of warm, soapy water and scrub off all the carbon from the grates. Then turn off the gas, and disconnect and remove the propane tank. Let the grill cool completely.
For charcoal grills, simply dump the old charcoal briquettes into a metal container. Then, scrape away any caked-on charcoal dust and debris with a putty knife.
Soak It

Once the grill is cool, remove all the grates and flavorizer bars and totally submerge them into a tub of warm, soapy water. Let them soak for at least 30 minutes. Remove anything else from the grill that you can easily take off, such as burner-control knobs, warming racks, and grease trays. The burner tubes on most gas grills are removable, too; look for a single screw or cotter pin on one end of each tube. Stripping down the grill in this way will make it much easier to clean.
Use a Vacuum

With the grill grates and flavorizer bars are removed, the inside of the firebox is exposed and ready to be cleaned. Start by putting an empty bucket underneath the firebox, directly below the grease tray opening, to catch the soapy water and flushed out debris. Use a plastic putty knife to scrape off any caked-on gunk from inside the firebox.
Next, use a wet/dry vacuum, whether full-size or a portable, like Milwaukee’s M18 hand vacuum to collect any remaining loose debris. Since wet/dry vacs are mostly workshop items, you shouldn’t feel bad about using one to suck up the gunk that’s collected in your grill. Once the firebox is clean, rinse it out with a garden hose.
Scrub Everything

After the grates and panels have soaked, take them out and scrub them with the wire brush. For really stubborn gunk, mix a paste of white vinegar and baking soda and apply it directly to the worst caked-on food bits. Rinse all surfaces clean, making sure to thoroughly dry cast-iron grates to avoid rusting. And this is also a great time to inspect the porcelain grates for chips, which may eventually lead to rust. Repair any chips with porcelain touch-up paint.
💡Take a large piece of aluminum foil, crumple it up into a ball and then use it to scrub cooking grates clean of baked-on food particles.
Inspect your burners for signs of corrosion or for anything blocking the row of flame-emitting holes. Burner tubes are inviting spots for spiders to lay eggs if your grill goes unused for a while. Take a wire brush and brush back and forth across the row of holes. Then use a wire bottle brush to clean out the inside of each tube.
Wash and Wipe

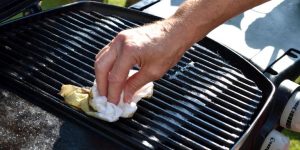
Empty the bucket of dirty water, then refill it with clean water and a few squirts of dish soap. Now scrub down the entire outside of the grill using a large kitchen sponge. Be aware the steel wool, metal sponges, and coarse scouring pads can cause scratches, so avoid using them on finished surfaces. After washing the outside of the grill, use super absorbent micro-fiber towels to wipe down and dry all surfaces.
Final Touches
Stainless steel cleaner works great as a final touch, but it shouldn’t be used to remove heavy buildup or baked-on gunk. Spray on the cleaner, wait a few minutes, then wipe it off with a clean, dry cloth. If you don’t have stainless steel cleaner, try using undiluted white vinegar; it’s also effective for cleaning stainless steel surfaces.
Once the grill is sparkling clean and thoroughly dry, reassemble all the parts you removed, taking care to fix the burner tubes back into place in proper position with cotter pins or screws. And rub cast-iron grill grates with a light coating of vegetable oil.
Finally, reconnect the propane tank, close the hood and fire up the grill; let it heat for at least 15 minutes, then turn it off. This initial firing will help burn off any cleaning residue, season the cast-iron grates, and serve as confirmation that you reassembled everything properly. The only thing left to do is get some burgers, dogs and steaks, and invite over a few friends.
Choose the Best Brush for the Job
The Ultimate Grill Brush 2.0
Junior Grill Brush